Monday, September 26, 2011

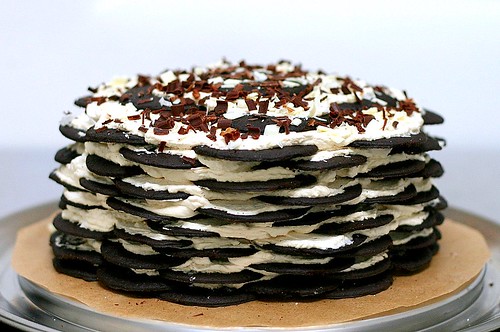
Chocolate Coffee Icebox Cake

Posted by - Kyleen.

Hi, I'm Kyleen, from sixteenbeans. and I'm so excited to join this month's Have the Cake Challenge! It seems that I joined at a perfect time, since I've had my eye on this icebox cake for a while.

*          *          *

Whipped cream is a saving grace. It can be used to make rich, creamy sauces, or replace a failed ganache, or to revive stale cake. In this month’s Have the Cake challenge, icebox cakes took center stage, with whipped cream as the star of the show. As much as I like cookies, whipped cream is definitely the best part of this Chocolate Coffee Icebox Cake.


Coffee and chocolate are such a natural combination that I had to add some coffee flavour in the chocolate cookies as well as the cream. The dark notes of coffee bring out the rich hues in chocolate, complimenting them oh so subtly. I used decaf instant coffee powder in this recipe, although in retrospect, I probably could have replaced some of the milk with coffee or espresso.


The cookies themselves are almost too delicious to be made into a cake. As soon as they came out of the oven, I was salivating. I picked one up while still hot and ate it. Someone has to do quality control, right? Well, it seems that the rest of my family agreed, because one by one, they trickled into the kitchen, following the alluring scent of chocolate and coffee. With my back turned, they grabbed the cookies and I tried to shoo them away. My icebox cake would have been two inches taller if not for the sneaky hands of my younger brother who has a penchant for cookies.


I didn’t bake my chocolate cookies to be quite as crisp as advised because I like that soft and chewy texture. So I figured that the cake would be suitable to eat a couple hours after I had assembled it. The cookie layers were sufficiently softened and the cake was deliciously moist and rich. The next day, I cut myself another slice and to my slight surprise, the cake had transformed completely into a rich, dense, almost fudgy brownie with thin layers of cream in between. The coffee cream was more subdued and the two components blended seamlessly. Obviously, this is one of those cakes that just get better and better with time.

Click below for the recipe.

Friday, September 23, 2011

Icebox Cake Redux

Posted by - Dorrie

For a long time when I was a child my favorite birthday cake was an icebox cake that my mother would make with chocolate wafers and whipping cream. Using the whipping cream as glue between the wafers she would stand them up on their sides, form them into a loaf and then slather the whole thing with whipping cream and keep it in the refrigerator for 24 hours. By the time the birthday celebration rolled around the wafers were as soft as cake and so delicious!

Then a few weeks ago my mother called me all excited about an episode of The Barefoot Contessa that she had just watched. Apparently Ina Garten makes a delicious Mocha Icebox Cake, and uses a spring form pan - hooray! - no more delicate loaf making! Ina, who is not afraid of fat (yay!) also adds marscapone, kahlua, cocoa powder, etc. to her whipping cream - yum!

So when this month's Have the Cake challenge turned out to be Icebox Cake I jumped at the chance to make my own version of Ina Garten's icebox cake. As much as I love the sound of it, I skipped the marscapone, and because I was taking the cake to a dinner party with kids (including my own) I also skipped the espresso powder and kahlua.

My version goes like this:

In a stand mixer or with a hand mixer mix until it forms stiff peaks:

3 cups of heavy whipping cream

1/2 cup of sugar

2 Tablespoons of cocoa powder (I used the really nice Dutch stuff)

1 tsp vanilla extract

I lined the side of my spring form pan with butter and then parchment paper. On the bottom of the pan I made a layer of chocolate wafers (the Nabisco "Famous Chocolate Wafers"), filling in any holes between the round cookies with broken cookies. I then spread 1/5th of the whipping cream mixture on top and continued layering until there were 5 layers of cookies, each covered with whipping cream.

Layering the ice box cake
Layering the icebox cake

After the cake had spent 24 hours in the refrigerator I grated dark chocolate and white chocolate on top for a finishing touch. Here's the finished product, ready for devouring:

Finished cake
Finished cake

The cake was pretty on the outside and on the inside and tasted absolutely delicious:

Yummy!
Yummy!

We completely decimated the cake, several people going back for seconds (including myself). I love my new version of icebox cake and may never go back to the old loaf again. So delicious!

Thursday, September 8, 2011

As Ice Box as it is going to get!!!


Posted by - Vivian Thiele
http://letstrythese..blogspot.com
I had never heard of an Ice Box Cake and the process certainly was intriguing!  I didn't really follow any set recipe and I didn't exactly use cookies either.  During our last vacation, Neil and I went to a Russian grocery store.  They had these thin wafers packaged together. about 10 all together, and so we bought some with the intent on figuring out how exactly it was used in their recipes.  Well, I haven't figured that part out yet but we did have success with using it in our version of the Ice Box Cake.


These are the wafer layers.... if you have any idea how they are supposed to be used please do tell!
My layers were homemade whipped cream with cream cheese, and chocolate ganache.


I "iced" the cake with the cream cheese and whipped cream mixture then sprinkled on mini chocolate chips.
We were too impatient to let it set over night, but we did wait a good eight hours!  Turned out to be super yummy!

Wednesday, September 7, 2011

Strawberry Icebox Cake


Posted by - Rena

This was my second attempt at an icebox cake this week. I decided to get creative and make a lemon vanilla icebox cake with layers of non-fat vanilla pudding, low-fat graham crackers with lemon curd spread on the crackers. I layered everything but the color of the pudding was so unappetizing that I couldn't even eat it. It was a very artificial shade of yellow. Gross.

I have made the chocolate wafer icebox cake twice before so I wanted to try the strawberry cake from The Kitchn next. What could be bad about strawberries and cream? Nothing.

These cakes are so easy to make and so, so delicious. I made two layers of low-fat graham crackers, real whipped cream (with a dollop of vanilla bean paste and a very small amount of sugar) and fresh strawberries. I decided to leave out the chocolate because 1) I can't be trusted with a block of chocolate in the house and 2) I didn't think it was really necessary.

I was supposed to wait for 4 hours but I caved after 2. I'm sure it will be even better today now that the crackers have softened but it was tasty! I made a bowl of it instead of a loaf pan full because I have no will power. :)

Thursday, September 1, 2011

September Challenge: Icebox Cake

photo from Smitten Kitchen


Posted by - Rena

Happy September! I am thrilled that summer is almost over. It was a lovely summer but I'm ready for fall. It's still pretty warm out so I thought an icebox cake would be perfect to usher us into the next season. No one wants cold desserts when it's snowing! I always joke (to myself) that icebox cakes are the dessert version of casseroles. You can just layer away with goodies and somehow they all settle in nicely together. I first learned about these cakes from Smitten Kitchen. The recipe is super simple. I've made it twice and I swear to you, the cake tastes like a giant Oreo cookie. There are a million versions of icebox cakes that use ingredients such as pudding, cream cheese and whipped cream so have a look around the internet and find the one that suits you. I realize there isn't any baking involved, unless you'd like to bake your own cookies, wafers, cake or graham crackers but September is always busy so we can make something delicious without even turning on the oven!

Here are a few variations I found:
Cinnamon & Cream Cheese Icebox Cake
Strawberry Icebox Cake
Raspberry Icebox Cake
Lemon Graham Cracker Icebox Cake
Chocolate, Peanut Butter & Banana Icebox Cake
Nutella Icebox Cake

Happy Layering!

Wednesday, August 31, 2011

August Roundup & 2 Year Anniversary!

Candy Bars! Thanks so much Nancy for jumping in this month with a great challenge! Such a fun idea.

Have the Cake is 2 years old! Wow! Thank you so much for keeping this little idea alive and kicking.


Tuesday, August 30, 2011

At it again

Posted by - Nancy

Okay, so after my Kit Kat kinda fail I really wanted to have something good come out of this challenge. So I asked my husband what he would like and he said Snickers. Well, I knew I had seen a few recipes and quickly found this one from Instructables.

Homemade Snickers

After a quick trip to the store (okay not quick, it was our weekly shopping trip and all four of us went), I was armed with the ingredients to make Snickers.

It started out well:

Bottom layer of chocolate.

Next I added the nougat (easier to make than I thought), but I forgot to snap a photo of it.

Then came the melting:


After freezing it after every layer, I put it in the freezer over night since it was late and I was tired.

Unfortunately the next morning I set them out to thaw a bit and ended up with this:


So I plunked the whole thing back in the pan to firm up again.


I got nice bars out of it. They look pretty. And they taste good. Almost like the real thing, if you know, you love massive amounts of sugar. I have to agree with Erin on these, they are way to sweet. After one bite each, I threw them out. I was afraid if I tried to give them away in this Texas heat (112 degrees y'all) I would be handing some one a giant glob of melted goo. I think it's the nougat layer. Without whipping it like the candy makers do you just have this concentrated layer of sugar.

So, I am glad I tried them. They we definitely better than the homemade KitKats. And I am glad to know that the carmel and peanut layer is dead on for taste. Maybe I will make that and the chocolate layer only next time!

Sunday, August 28, 2011

Whatchamacallit (call them soooo good) Bars

Here's a copy of the recipe-I did everything as written except the brown sugar-I used Splenda Brown.
Homemade Whatchmacallit bars

The recipe was easy and the bars were chewy, crispy, delicious and it makes A LOT! I actually preferred the ones I did not dip in chocolate. The recipe uses bittersweet chocolate and I think milk might be better if I make them again. All in all-totally worth making and my co-workers will hopefully enjoy them as well because there is no way I'm keeping all of these in my house!!


Posted by -colleen

Thursday, August 25, 2011

Homemade Rolos

Posted by -vivian thiele
I loved this challenge... even if it was messy! I don't know why but whenever I work with chocolate I end up having myself covered in it!
I have a truffle candy mold so I thought that maybe using caramel instead of a truffle filling would give me a Rolo candy.  Didn't quite have the taste of a Rolo, but it was pretty darn good!  I only had dark chocolate on hand and I think using milk chocolate would have been much better.
Homemade Rolo Candies
Caramel filling:
1 cup sugar
3/4 cup light corn syrup
1 cup evaporated milk
1/4 cup margarine
1/2 teaspoon vanilla

Chocolate coating:
1 pound dark chocolate,  tempered and ready to use

Directions:
Combine sugar, corn syrup, milk and margarine in a saucepan.  Stir an heat to 248 degrees F.  Remove from heat, add vanilla and pour onto a well butter cookie sheet.  Set aside to cool.  At this point you can score into sections the size you desire. I took sections and rolled them into small marble size pieces and covered with chocolate.

Many people fear tempering chocolate but it really is an easy process.  Use a good quality chocolate, not chocolate chips or the candy coating bark most grocery stores carry.  The quality of chocolate will determine the taste so spend a bit of extra money on it!
I use a double boiler to melt the chocolate, but care must be used to not  get water into the chocolate.  Water in chocolate can cause the chocolate to "Seize" up.  This problem can be fixed but it is best to avoid it altogether and just be careful.  Using a candy thermometer, melt the chocolate and let it get to 110 degrees F. Remove from the heat and let it cool to 89 degrees  F. Return to the heat and warm it up again.  Simple. There are other techniques out there but this is how I was taught.  If during the second warming it gets to warm, just remove it from the heat.  Any chocolate you don't use can be dried and stored again until next use; it doesn't need to be tempered again.  Tempering the chocolate gives your candy the nice glossy look one desires when making candy.
turn over the molds and let the excess drain out.


Tuesday, August 23, 2011

"Snickers" Bars


Posted by - Erin
I am actually remembering to post this month! I made pound cake a few months ago (epic fail saved only by LOTS of glaze) and totally forgot to post it... So here we go--Snickers, one of my husband's favorite candies!
The recipe was easy enough, I got it at food.com. http://www.food.com/recipe/snickers-candy-bars-95145 Easy to follow, and I had most of the stuff on hand, which was nice! I don't have enough time today to post the full recipe, but here's the gist of it (after each layer you put it back in the freezer, which of course requires reorganization of your freezer):
layer 1: 1 cup chocolate chips, 1/4 cup butterscotch chips, 1/4 cup PB. melt and spread on bottom of pan.
layer 2: boil 1/4 cup butter, 1 cup sugar, and evaporated milk for 5 minutes, add 1.5 cups fluff, 1.5 cups chopped dry roasted SALTED peanuts, 1/4 cup PB. spread on top of hardened chocolate.
layer 3: 14 oz carmels melted into 1/4 cup whipping cream. spread on top of "nougat"
layer 4: repeat layer 1
They were great, EXTREMELY sweet. Early onset diabetes sweet. My husband is taking the rest to work tomorrow. :)
And what I will tweak next time...
1. Find carmels that are not individually F-ing wrapped.
2. The butterscotch chips don't melt the same as the milk chocolate. I was so worried about burning the milk chocolate that the butterscotch never fully melted. Next time I am either going to skip the butterscotch or melt them separately.
3. The chocolate on the bottom was almost non-existent. Next time I think I will line the pan with parchment and make just the middle layers (nougat and carmel) and then cut into cubes and dip in chocolate so that they are fully covered.