Showing posts with label january. Show all posts

Wednesday, January 30, 2013

Vanilla Love Cupcakes with White Chocolate Truffle Centers


I made cupcakes for one of my dear friends Shannon who had a lunch party at her house earlier today. I've known Shannon for many years since we live just around the corner from each other, but it wasn't until our boys played on the same baseball team a few years back that we got to be really good friends. Shannon has a great heart, with a little "firecracker" thrown in for fun. She's super thoughtful AND she's a great shopping buddy. Her family has been through a lot in the past year and a half, and through it all, she's handled it with grace and love, concern and caring. Last year, I wrote a post where I was musing about all kinds of things including life being beautiful, and one of the things I wrote was, "Beauty is in the strength of a mother (and my beautiful friend) taking care of her child with cancer, who would do anything to make it better for him." I was thinking about my friend Shannon when I wrote that. It's been a long hard road for them and there's still some road to travel, but things are going in the right direction. Even with everything they've been through, she makes time to connect with other families who are going through the same thing, like this lunch she had at her house where she invited several of those families to enjoy a fun and relaxing afternoon with her family. It was my pleasure to make cupcakes for them.

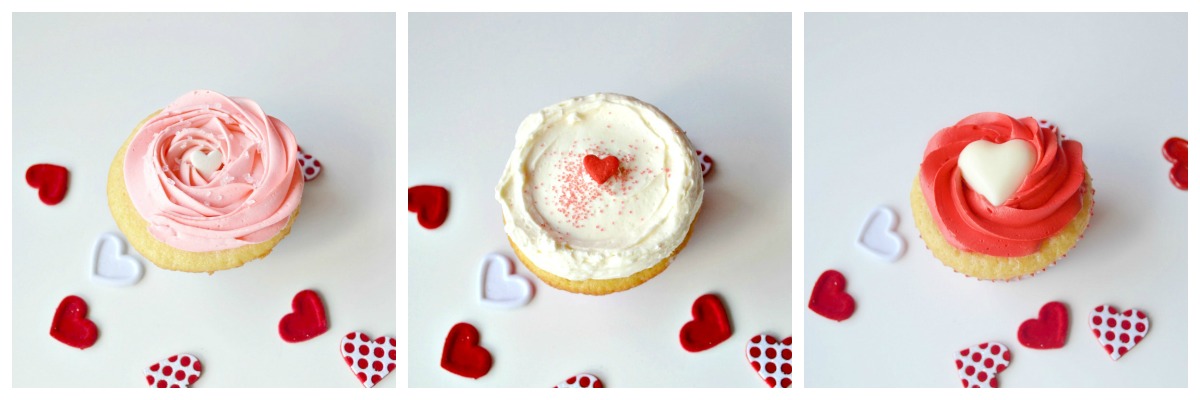
Since it's so close to Valentine's Day, I made luuuv cupcakes (said in a Barry White voice). Shannon isn't a big chocolate fan, so I made vanilla cupcakes with vanilla buttercream frosting. Everyone's good with vanilla, right? Just to keep it from being too "vanilla", I added a white chocolate truffle center to the cupcakes. You might have seen images all over Pinterest where you stick a Lindt truffle in the center of a cupcake right after it comes out of the oven, and that's exactly what I did. Easy!

I used a new vanilla cake recipe for these cupcakes. I'm always on the search for a great vanilla cake recipe. I tend to like stronger flavors so when I do eat a vanilla cupcake, it's got to be really good to win me over. I found this recipe at Glorious Treats called "Perfect Vanilla Cupcakes". That's quite a claim! I think she did pretty well with this recipe, much better than some other recipes I've tried. After reading the reviews and my own trial run, I made a few adjustments to the recipe like increasing the sugar just a tad, decreasing the salt a smidge, sifting the dry ingredients, and adding the vanilla at the end since I read somewhere that vanilla dissipates quickly and should be added to the end of the mixing (is that even true? I've thought that for years). I also had to increase the cooking time from the original recipe quite a bit but it will vary depending on ovens. I just checked every two minutes until they were done.

Once the cupcakes were cooled, I frosted them with my favorite vanilla buttercream frosting from Cook's Illustrated. It's easy, reliable, and delicious. Because I was in the mood for love, a divvied up the frosting into 3 bowls, left one untinted, tinted one pink, and tinted the last one red and made the cupcakes look all valentinesy.

When I dropped off the cupcakes at Shannon's house last night, her son Nate took one look at them and said, "Those are so perfect! I don't think they'll make it to lunch tomorrow!" That made my heart happy. Then I was rewarded with a plate of homemade cookies and a cupcake calendar. Isn't friend-love grand? JOY!
vanilla love cupcakes with white chocolate truffle center

Vanilla Love Cupcakes with White Chocolate Truffle Centers
Adapted from Glorious Treats
Printable version (including buttercream frosting recipe below)
Makes 12 cupcakes

Ingredients:
1 1/4 cups cake flour
1 1/4 teaspoons baking powder
1/2 teaspoon baking soda
1/4 teaspoon salt
2 eggs
1 cup sugar
1/2 cup oil (vegetable, canola, or extra light olive oil)
1/2 cup buttermilk (see Glorious Treats for vinegar/milk alternative)
1 1/2 teaspoons pure vanilla extract
12 Lindt (or other brand) white chocolate truffle balls

Preheat oven to 350 degrees fahrenheit. Line standard-size muffin pan with baking cup liners.

Sift cake flour, baking powder, baking soda and salt in a medium bowl. Set aside.

In a standing mixer with the whisk attachment (you can use a hand mixer too), add eggs and beat 10-20 seconds. Add sugar and continue to beat on medium speed about 30 seconds. Add oil and beat for another 20-30 seconds.

Reduce mixer speed to low and slowly add about half of the flour mixture. Add half of the buttermilk, then the rest of the flour, then the rest of the buttermilk, and the vanilla. Beat until just combined. Scrape down the side of the bowl.

Pour batter into prepared muffin pan. Fill liners about 2/3 full. These do rise pretty well and I guess I filled most of mine a little more than 2/3 full because they did overflow a little bit and created a little mushroom top effect. That's not a big problem for me but if you prefer a cleaner looking top, keep it at 2/3 or a little less full.

Bake cupcakes for 12-18 minutes. Mine took about 18 minutes but other reviews showed they were done as quickly as 12 minutes, so I recommend you start checking around 12 minutes and check every 2 minutes. Cupcakes are done when they spring back to the touch and a toothpick comes out clean.
vanilla love cupcakes with white chocolate truffle center

While cupcakes are in the oven, unwrap truffles and set aside in a bowl. As soon as the cupcakes come out of oven, set pan on a rack and insert a truffle right into the center of the cupcake, pushing it down about 3/4 way in so some of it still peeks over the top of the cupcake. It will melt and settle in the rest of the way and stay softened even after cooling. You might even have a little divot there after they're fully melted; just fill it with frosting. :)
vanilla love cupcakes with white chocolate truffle center

Cool cupcakes in pan for 10-15 minutes, then carefully remove cupcakes from pan and cool completely on a wire rack. Once cool, frost with vanilla buttercream frosting {recipe below} and decorate to your heart's content!

Vanilla Buttercream Frosting
Adapted from Cooks Illustrated
Makes 3 cups

Ingredients:
3 sticks (1 1/2 cups) unsalted butter, softened
3 cups confectioners’ sugar
1/4 tsp table salt
2 tsp vanilla extract
3 Tbsp heavy cream

In standing mixer fitted with whisk attachment, beat butter at medium-high speed until smooth, about 20 seconds.

Add confectioners’ sugar and salt; beat at medium-low speed until most of the sugar is moistened, about 45 seconds.

Scrape down bowl and beat at medium speed until mixture is fully combined, about 15 seconds; scrape bowl, add vanilla and heavy cream, and beat at medium speed until incorporated, about 10 seconds, then increase speed to medium-high and beat until light and fluffy, about 4 minutes, scraping down bowl once or twice.

Someone asked me about what vanilla I used for this. Since vanilla is the star in this cupcake, I recommend you use a good quality vanilla. I use Nielsen Massey madagascar bourbon pure vanilla extract. Some people might choose to use the scraping from a real vanilla bean or vanilla bean paste. I say go for it! According to the folks at Nielsen-Massey, one teaspoon of vanilla extract is about equal to one vanilla bean or one teaspoon of vanilla bean paste or 1 teaspoon of vanilla powder.
Also, the white chocolate truffle does add an extra sweetness to these. If they're too sweet for you, consider decreasing the sugar in the cupcakes by 1/4 cup or using dark or milk chocolate truffles instead (my personal preference), or leave out the truffle completely.
*If you want to have the truffle center be all melty-gooey, then these are best served the same day you make them. The truffles do harden back up a bit the next day, but I actually prefer it that way.

Wednesday, January 23, 2013

Vanilla Cupcakes with Salted Caramel Filling & Salted Caramel Frosting

Posted by - Dixya @ Food, Pleasure, & Health


...if you have dirty dishes piled up, laundry that needs to be done ASAP, unread mail that needs to be opened, vacuuming, scrubbing and all that business Or, if you are an overachiever and have done all that (please come help me), fine don't- I like cleaning too but just not right now. Not today. 

If you are little overwhelmed like me, go run to your kitchen & surround yourself with heavy cream, flour, butter, sugar, sea salt and make a huge batch of salted caramel frosting, salted caramel filling and extra vanilla-y cupcakes and in the process pile up more dishes - what the hell you will be doing heck of a cleaning later anyways. The whole process is extremely therapeutic - it only takes a spoonful or two (but who's counting right) salted caramel frosting to calm this clean freak. I don't like when things are scattered here, there and everywhere but when I am not in the mood to clear the space I make candied salted caramel.. lets not clean today but shall we be creative, please? And eat all the cupcakes I want! 


Vanilla Cupcakes 
 

Makes about 6 cupcakes

Ingredients
  
3/4 cups all-purpose flour 
1/2 tsp baking powder
dash of salt
3 tablespoon unsalted butter (softened)
1/2 cups sugar (add less if you like less sweeter taste)
1 large egg
1 Mexican vanilla bean (scrape with pairing knife)
1 tsp pure vanilla extract


Directions
 
-Leave butter and eggs in a room temperature for an 1/2 hr or so
-Pre-heat oven to 350 degrees
-In a medium bowl, whisk flour, baking powder and salt together
-In KitchenAid Stand mixer (if using that) or a separate bowl, cream butter and sugar until light and fluffy. Then add egg to the mixture and continue beating it in medium speed then add vanilla extract and vanilla bean paste until everything is incorporated.
-Scrape the sides of a bowl

- Add flour and milk alternatively to the butter- sugar mixture and continue until everything is well combined.
-Divide batter and pour it in a lined cupcake pan filling about 2/3 full
-Bake for about 18 minutes or until the toothpick comes out clean
-Remove from oven and allow it to cool completely


While the cupcakes are in the oven, go ahead and make the most legit frosting of all times - Salted Caramel Buttercream Frosting. The recipe is from Taste of Home fairly easy & requires almost the same ingredients as the caramel filling (recipe below). The recipe calls for leaving it in refrigerator for 4 hours but I left for only 2.5 hours. The final result was extremely fluffy, too good to be true and had to stop myself from tasting licking the bowl.. Its for 10 cupcakes but go ahead and make the full recipe. You can thank me later. 


I hope we all feel same way about Salted caramel filling inside a cupcake right? It perfectly compliments the vanilla cupcakes and keeps the center super moist. I adapted the recipe from 52kitchenadventures & halved it. This is one of the easiest, no fail recipe & I added sea salt to finish it off.

Normally, I have no patience - we all know that. It gets worse when there are cupcakes on a cluttered counter top and caramel butter cream frosting heaven in the refrigerator- try resisting that..its almost painful but today I am trying to be patient and not obsess about messy house or dirty laundry. I want to bring out the hidden patient, creative side of me and decorate these babies with salted candied caramel. The recipe is from Cupcake Friday Project. These candied caramel thingy always intrigued me on TV - it was pretty cool (although I burned it a little bit) but that's my attempt to be creative.


Okay, seriously,this patience business is starting to annoy me and me want some cupcakes. Can we assemble them already?

First whip up the butter cream frosting as directed in the recipe. Stir the caramel filling and get ready for some serious cupcake! Use a pairing knife to cut the center of cupcake, add about 3/4-1 tablespoon filling in the center and frost it. Adorn them with caramel candies. Sprinkle some sea salt.
Although it was little lengthy of a process, each component of this cupcake was worth it..slightly sweet vanilla cupcakes was perfect with salted caramel filling and the frosting - it was spectacular. Candied caramel spirals added a slight crunch which I enjoyed a lot. Let's just say it was worth every minute, every calorie/fat/sugar consumed because guess what - I need all that energy, for I have massive cleaning to do!

Friday, January 18, 2013

Lemon and Blueberry muffins

Posted by - Rhonda's Saucy Adventures
Lemon and Blueberry muffins

Recipe adapted from BBC Food

I found two recipes that looked really good...I couldn't decide so I made both. These were my husbands favorites. I had extra crumble left over from the other recipe so I put it on top of these mini muffins. I liked both muffins so I will keep both recipes in my GO TO binder.

Ingredients

1/2 cup butter
1 tsp baking powder
1/2 cup sugar, plus 2 tsp for sprinkling
1/2 cup blueberries
1 tbsp lemon juice
zest from 1 lemon
2 eggs
5fl oz lemon yogurt

Directions

  1. Preheat the oven to 400F. Line a 12-hole deep muffin tin with paper cases.
  2. Melt the butter in a small pan over a low heat then set aside to cool for a few minutes.
  3. Sift the flour and baking powder into a large bowl and stir in the sugar, blueberries and lemon zest. Make a well in the center.
  4. Beat the eggs with a whisk until smooth then beat in the yogurt, milk and melted butter until well combined. Stir into the flour mixture with a large metal spoon until very lightly mixed.
  5. Divide the batter between the muffin cases. Place a teaspoon of the lemon curd on top of each one and sprinkle with the remaining sugar. Bake for 20 minutes or until well risen and golden-brown. Serve warm or allow to cool on a wire rack. (The lemon curd will be very hot, so don’t eat as soon as they come out of the oven.)

Wednesday, January 2, 2013

Happy New Year! January Challenge

Posted by - Rena

Happy New Year!

This month's challenge is to make cupcakes, muffins or popovers. Basically the challenge is to make anything that fits nicely in a muffin tin. Who doesn't like a cupcake?! Since I'm sure we all ate enough for 2013 over the holidays, feel free to make muffins or popovers as well. Popovers are one of my favorite things but take a little finesse to make from scratch.

Hope everyone had a wonderful holiday and a very happy new year! Happy 2013!

photo from MarthaStewart.com

Tuesday, January 31, 2012

January Roundup

I'm so hungry making this recap! Gorgeous cinnamon rolls. Thanks to everyone who participated and welcome to all our new bakers!


Thursday, January 26, 2012

Brioche Cinnamon Rolls

Posted by - Winnie


Brioche Cinnamon Rolls
Rich yeast buns,
sweet, soft and luxurious


I love baking with yeast, and I actually bake Challahs (Jewish bread) every Friday, creating my own different recipes.
There is nothing like the smell that fills the house when I bake yeast pastries.
So I was very pleased to find out that this month's challenge was cinnamon-buns.
I love cinnamon(!), and love yeast pastries  - perfect combination for me J and I've decided to make a brioche
** Please note that my original post is in Hebrew


12 rolls - I used 21 cm round pan + 2 small pound cake pans
you can also use 20X30 square pan

For the dough
450gr bread flour
25gr fresh yeast
4 egg-yolks
40gr white sugar
10gr vanilla sugar
1 tsp trimoline sugar
30ml heavy cream
180ml vanilla milk
½ tsp vanilla extract
1 tsp lemon zest
1 tb powder-milk
1 tsp salt
150gr soft butter

For the filling
100gr soft butter
220gr dark brown sugar
1 heaping tb cinnamon

1 egg beaten with 1 tsp water for brushing the buns before baking

For the syrup
50gr white sugar
50ml water
½ tsp vanilla extract


In the mixer-bowl crumble the yeast into the flour  add the powder-milk, white sugar, trimoline-sugar and the vanilla- milk and start mixing on a lower speed until all is well mixed. Continue for 3 more minutes, and only then start adding the butter cubes gradually. Wait until each cube of butter assimilates before adding another cube.
Add the salt and continue on a low-medium speed for at least 8-10 minutes
The dough should be very soft and elastic but slightly sticky.
Lightly oil a large bowl, place in the dough and cover with a plastic wrap. Refrigerate overnight (or 6-8 hours)
The dough will not rise much - but it's fine!

In the morning prepare the filling
Mix well the sugar and the cinnamon
Line the pans with baking sheets and grease with butter
Take the dough out of the refrigerator, knead for a minutes and roll it to 30X42 rectangle.
I don't ever work on a floured surface – I slightly oil the it and my hands.
Spread the butter and sprinkle evenly on top with the sugar-cinnamon mixture. Roll the dough


Cut it into 12 portions and place them in the prepared pans. Cover and let rise for 45-60 minutes (until the tough one another)


Pre-heat oven to 170 C (340 F)
Brush with egg mixture and bake for 30-35 minutes
While baking, prepare the syrup
Bring to boil the water and the sugar while stirring. Lower the heat and cook about 3 minutes, stirring occasionally.
Remove from heat, add the vanilla extract and stir.
When the rolls out of the oven and brush them the the syrup. Wait 2-3 minutes and take them out of the pans and place them directly on a reck. Cover them with a tower and let them cool.
ENJOY !!

You can also freeze some after cooling completely, and then warm them up in the microwave - covered with a towel - they turn out just like they came out fresh from the oven


Monday, January 23, 2012

Cinnamon Rolls

Posted by -mmw2008- Con DeLight
 
January's challenge on Have The Cake is Cinnamon Rolls.
At first, my intention was to step aside and wait for next month's challenge
but talking with my good friend Winnie, I've changed my mind and decided to make cinrolls that will be tasty for me too- and there's nothing more appropriate than Chocolate!
I must say the result is amazing :)

Ingredients:
For the dough:
T dry yeast
4 cups flour
2 L eggs + egg yolk
½ t salt
½ cup canola oil
½ cup white sugar
¼ cup warm water

For the filling:
30G milk chocolate, grated
1/8 cup white sugar
T ground cinnamon
12.5G butter

For the Topping:
112.5G butter
1 ¼ cup packed brown sugar


Preparation:
Mix the dry ingredients of the dough, add the liquids and knead until you form an elastic
and smooth dough. Set aside to rise – my dough hasn't risen much and I guess it's
because of my yeasts or the lack of willingness in my side to wait :)
Meanwhile, make the topping by melting the butter and then adding the brown sugar.
Spread in a baking pan- You can use two small pans as I did (one round and the other a rectangle)
or you can use small-medium baking pan.
Mix the filling ingredients together, except the butter.
Roll the dough to form a thin rectangle. Melt the butter and spread over the dough.
Spread the filling on top of the butter and make a roll. Cut the roll into rings.
Place the rings on the pan we made earlier. Heat oven to 175C and bake for 20 minutes.
When the cinnamon rolls is out from the oven, wait for about 5 minutes
and then turn it on a plate. Doesn't it look gorgeous? Yummy :)

Tuesday, January 17, 2012

Cinnamon Rolls

Posted by - Elpiniki
This is my first post at Have the Cake, and I m thrilled! It was the first time to make cinnamon rolls and now I intend to make them again and again!

Ingredients
550 gr. flour all-purpose and 1-2 cups more
9 gr. dried yeast
200 ml warm milk
3 tbsp melted butter
1/2 cup sugar
2 eggs, room temperature
a pinch of salt
 
Filling
2 cups brown sugar
1/2 cup melted butter
3-4 tbsp cinnamon
 
How to Make
Place all ingredients (except the filling's) in a mixer bowl and knead with the hook kneading for 6 to 7 minutes until it gathers as a ball on the hook. The dough will be slightly moist. Then,  continue kneading with hands, adding flour - if nessesary - until you have a smooth, fluffy and not sticky dough. Put in a bowl covered with flour and let it in a warm place to double for 1 hour. 
In another bowl mix well the filling's ingredients until it looks like paste. 
When the dough is ready, put it on a floured surface and with a rolling pin open it in a rectangle shape. Spred the filling on the dough and roll it to become a stick. Cut it in pieces and place them on a large baking pan covered with a greaseproof paper. Let them stand for 30 minutes and turn on the oven at 180.
After half hour, cover them with beaten egg and put them in the oven for around 25 minutes. Serve them as they are or with icing sugar.

Saturday, January 14, 2012

Cinnamon Rolls


Posted by - Michelle S.

This month's challenge for Have the Cake is Cinnamon Rolls. I LOVE cinnamon rolls! I wanted to participate this month but did not want to mess with yeast. I made the Paula Deen ones before and they were awesome but take time. I found this one on Mommy's Kitchen's site. The recipe can be found here.

These were delicious! My son and his friend loved them. Best of all, they do not take long to make since they are made with crescent rolls.

Mine did not come out minis like Tina's did. I guess I didn't roll them tight enough. No worries...I put them into regular size muffin tins and they worked out great. I will definitely make these again and again! Loved them!

Monday, January 9, 2012

Cake Mix Cinnamon Rolls


Posted by - Vivian
We frequently eat these at our house so my challenge was to find a different recipe.  I came across this recipe on a site called Yummly.com.  I made a few changes such as using brown sugar instead of granulated sugar and drizzling with Karo syrup.  I thought I had a box of French Vanilla Cake mix and that would have taken this recipe through the roof!  The boys all gave it a thumbs up so I guess its a keeper!


Cake Mix Cinnamon Rolls
Adapted from  http://www.yummly.com/recipe/Cinnamon-Rolls-Allrecipes
5 cups all-purpose flour
18 1/4 ozs cake mix (yellow)
1/2 oz yeast
2 1/2 cups warm water (120 to 130 degrees f/50 degrees c)
1/4 cup melted butter
1/2 cup brown sugar
2 tsp ground cinnamon 
3 tablespoons Karo Syrup (optional)

 In a mixing bowl, combine 4 cups flour, dry cake mix, yeast and warm water until smooth. Add enough remaining flour to form a soft dough. Turn onto a lightly floured surface; knead until smooth and elastic, about 5 minutes. Place in a greased bowl, turning once to grease top. Cover and let rise until doubled, about 45 minutes.


Punch dough down. Turn onto a lightly floured surface; divide in half. 


Roll each portion into a 14-in. x 10-in. rectangle. Brush with butter; sprinkle with sugar and cinnamon... I also like to drizzle 3 tablespoons of Karo Syrup over it.


 Roll up jelly-roll style, starting with a long side. Cut each roll into 12 slices; place cut side down in two greased 13-in. x 9-in. x 2-in. baking pans. 


Cover and let rise until almost doubled, about 20 minutes.


Bake at 400 degrees F for 10-15 minutes or until golden brown. Cool for 20 minutes.
Yields 24

Sunday, January 1, 2012

January Challenge: Cinnamon Buns

HAPPY NEW YEAR!

This is the time of year when everyone makes resolutions to lose weight, so I decided our challenge should be as fattening as possible! Who doesn't love cinnamon buns? As I sit here on the first morning of 2012, I wish there was a tray in front of me.

You can pick whatever recipe suits your fancy and as always feel free to put your spin on it.

I wish you all a very happy 2012!

Monday, January 31, 2011

January Roundup

BAGELS, BAGELS! Thank you Dorrie for such a great challenge. Thank you to everyone that participated. Looking forward to February!

Congratulations to one of our fellow HTC bakers, Nancy, on the birth of her daughter Sara Penelope at the beginning of the month.

Stay warm everyone!


Posted by -

Friday, January 28, 2011

Plain Bagels

Posted by - Corrine


I'm almost late with my first post for the January challenge on but here it is!

I love bagels, especially boiled bagels, which is really the only thing that should be calling itself a bagel.  I went with Nigella Lawson's bagel recipe.  I was a little leery since I find her instructions aren't always as detailed as a novice might need, but I'm getting confident with my baking so I gave it a go.

The bagels turned out perfectly.  Well, not nearly as pretty as her's but there were a few decent ones that made it in the photo.  I used my Kitchen Aid mixer to knead the dough, and it almost overheated.  I think once the dough really comes together it would be wise to knead it by hand.  I literally think I would cry if something happened to my mixer.

Not terribly labour intensive, these bagels are worthy of a bakery (other than their looks) so I'll definitely make them again, although I probably could have let them brown just a bit more.

Note: These bagels got quite hard the next day, so eat them fast or freeze them within a day. :)


Nigella's Bagels
6 3/4 - 7 c bread flour, plus more as necessary for kneading
1 tbsp salt
1 pkg Rapid Rise yeast
2 tbsp sugar
1 tbsp oil, plus more for greasing
2 1/4 c warm water (about 110 F), plus more as needed
2 tbsp malt or sugar for poaching
2-3 baking sheets, oiled or greased

1. Combine flour, salt and yeast together in a large bowl. In separate container, add sugar and oil to the water. Make a well in the dry ingredients and add the liquid, mixing to a dough with a spatula or wooden spoon.

2. Knead the dough either by hand or with dough hook, try to add more flour if you can. The dough is better dryer than wet. It will be stiff and hard to work. Even with a dough hook, kneading takes about 10 minutes. (keep an eye on this if you're using a mixer, I found it only took about 8 minutes)

3. Form the dough into a ball and put it into an oiled bowl, turning once to coat all around. Cover the bowl with plastic wrap and leave to rise for 1 hour. Once dough is well risen, poke with finger to test; impression should remain.

4. Punch the dough down and knead again, divide into 3 pieces. Using your hands, roll each piece into a rope then cut each rope into 5 pieces. Roll each piece between the palms of your hands into a ball, then roll another rope; curling to form a ring. Seal the ends by overlapping and pinching the ends together.

5. Put on a large pan of water to boil, when it boils, add malt or sugar.

6. Set the bagels on the baking sheets, cover with tea towels and leave for 20 minutes. Bagels should grow puffy. Preheat oven to 500 F(or your oven's max temp.)

7. When the water is boiling, start poaching. Drop in a few bagels at a time. Boil for 1 minute, flipping once. Remove from water, place back on baking sheets. Bake for 10-15 minutes until they're shiny and golden brown.

Makes 15 Bagels

Thursday, January 20, 2011

Bagels, Bagels!

Posted by -Lena

Bagels are always there on my 'to-bake' list but it's never been a priority here. But this time i know it's an opportunity for me to bake those bagels..that's the theme for this month Have The Cake (HTC) event. The challenging part of baking bagels to me is the boiling part..i'm not quite sure how to do it so i've actually watched a few clips in youtube. There some time given for the bagels to rise therefore I have to be really careful and gentle when transferring the bagels to the pot for boiling, otherwise they will all turn wrinkled. I've come across a few recipes for bagels, they all have different boiling time, some 30-60seconds and some 15seconds. I understand that the longer the boil, the chewier the crust will be. This applies too if we want a thicker crust and bagels are also meant to be dense. So dont expect it to be like those asian type of soft fluffy buns that we usually love, it's not. But the ones that i have in Coffeebean  here are not chewy, wonder why? Can somene tell me  what is really the texture of a true and good bagels, do they have to be very chewy till one's jaw get tired? There's a variety to put for toppings... poppy seeds, sesame seeds, cinnamon sugar, onions, etc..and make your favourite fillings and it's best to eat it fresh out from the oven while the crust is still crispy, it will lost its crispyness after a while.


Ingredients:( Biscuits, Baking and Cakes - the essential recipe cookbook)
450gm strong plain flour/bread flour
1 1/2 tsp salt
2tsp easy blend dried yeast
2 medium eggs
1 tsp clear honey ( i skipped this)
2tbsp sunflower oil
250ml/90z tepid water

To finish:
1tbsp caster sugar
beaten egg, to glaze

Method:
1.Preheat oven to 200C/400F 15 minutes before baking. Sift the flour and salt into a large bowl. Stir in the yeast, then make a well in the centre.Whisk the eggs together with the honey and oil. Add to the dry ingredients with the tepid water amd mix to form a soft dough.
2.Knead the dough on a lightly floured surface for 10 mins unti lsmooth and elastic. Put in a bowl, cover with clingfilm and leave in a warm place to rise for 45 mins, or ubtil doubled in size.
3.Briefly knead the dough again to knock out the air. Divide the dough into 12 pieces, form each into a 20.5c/8inch roll, curve into a ring and pinch the edges to seal. Put the rings on an oiled baking sheet, cover with clingfilm and leave to rise in a warm place for 20 mins, or unti risen and puffy.
4. Add the caster sugar to a large saucepan of water. Bring to the boil, then drop in bagels one at a time and poach for 15seconds. Lift out with a slotted spoon and resturn to baking tray.
5.Brush the bagels with beaten egg and sprinke with toppings. Bake for 12-15minutes or until golden brown.